Issuance Overview
This is the reference account of the issuance flow: who is involved, and what happens in what order. The pages that follow cover each part of it in detail, and every one of them refers back to the step numbers here.
Who is involved
- Your application — usually a website. Holders interact with it to obtain a credential. It authenticates the holder, asks the issuance service to start an issuance, and hands the resulting credential offer to the holder's wallet.
- Your authorization server — an OAuth 2.0 server that confirms the holder is entitled to the credential before the issuance service will issue it. This is optional: leave it out of the configuration and the issuance service acts as the authorization server itself. See OAuth 2.0 integration.
- The credential issuance service — the Partisia backend you run. It builds the credential, signs it with your key and certificate, and delivers it to the wallet over OID4VCI.
- The wallet — the holder's own app. It collects the credential and stores it. Any wallet that speaks OID4VCI will do; the Partisia ID Wallet is one of them.
The issuance service also publishes a status list, which is how a credential is later revoked. See Revocation.
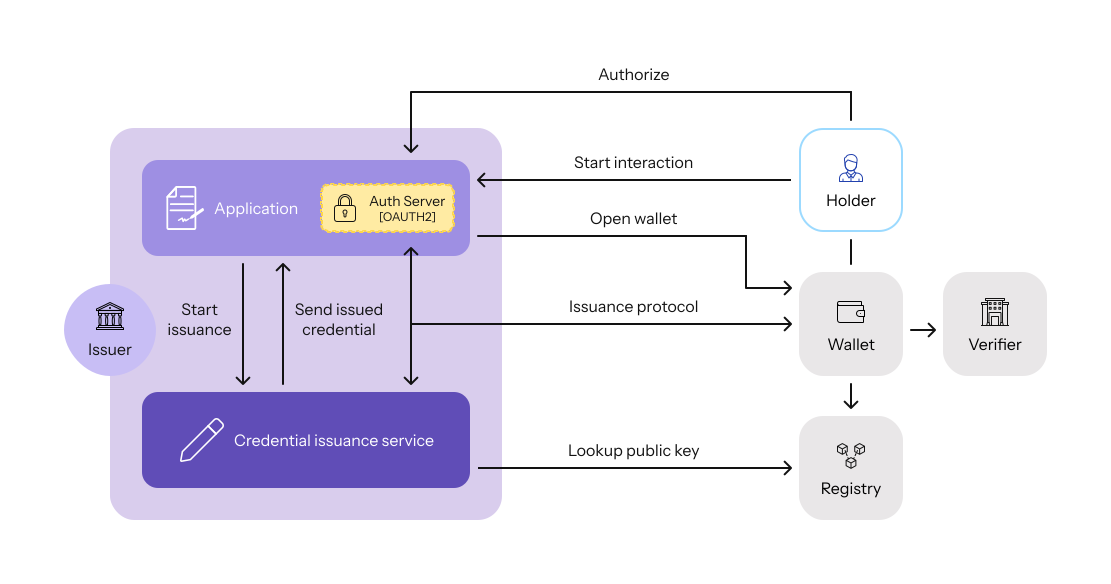
Issuance flow
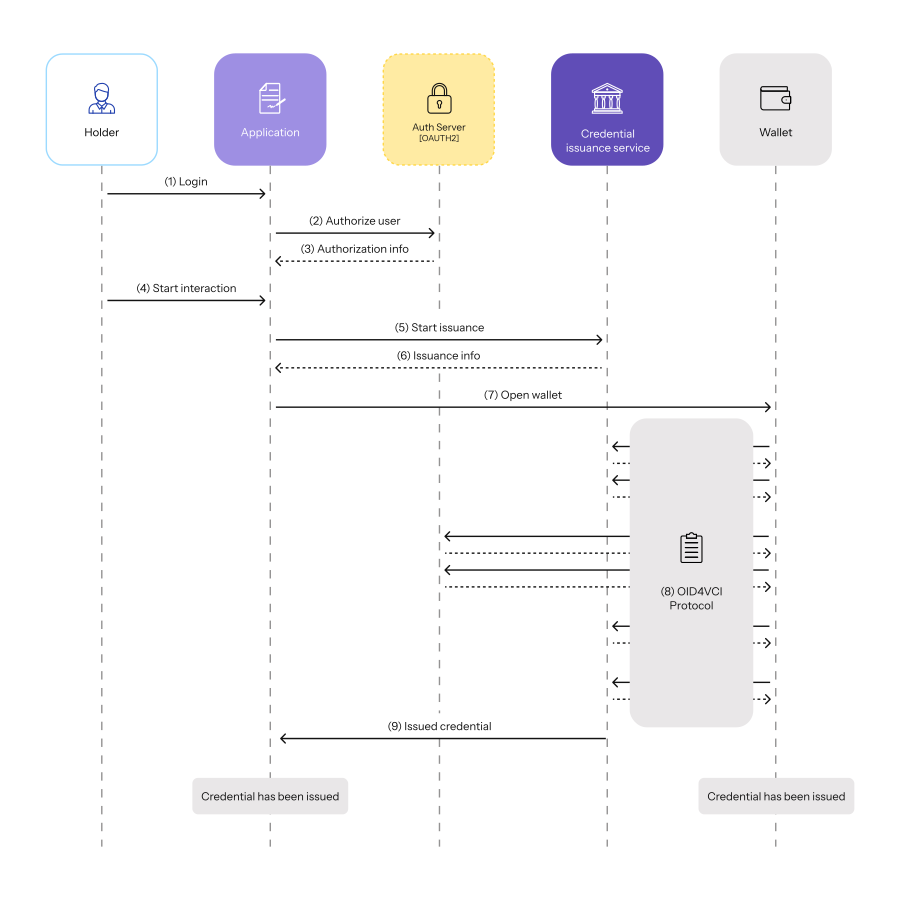
- The holder logs in to your application and begins authentication.
- Your application prompts the holder to authorize via the authorization server, verifying their identity.
- The authorization server passes the authorization result back to your application.
- Your application tells the holder they can now begin the issuance process.
- The holder requests a credential. Your application forwards this to the credential issuance service, naming a credential configuration and supplying the claim data.
- The issuance service prepares a credential offer, containing metadata about the credential and a pre-authorized code.
- Your application hands the credential offer to the holder's wallet, as a QR code or a URI.
- The holder accepts the offer, and the wallet and the issuance service carry out the OID4VCI exchange that delivers the credential. This is several round trips and the issuance service handles all of them; you do not write any of this code. See OID4VCI issuance protocol if you want the wire-level detail.
- Optionally, the issuance service pushes a copy of the issued credential to your application. See Receive the issued credential.
What is yours to build
Steps 1 to 4 are your existing login, unchanged. Step 8 is handled entirely for you.
What you implement is step 5 — the call that starts an issuance — step 7, handing the offer to the wallet, and optionally step 9, an endpoint to receive the result. That is the whole integration, and it is covered in Start an issuance.
What's Next
- Install the issuance service: Get it running.
- Credential configurations: Declare what you are able to issue. Required before step 5 will work.
- Start an issuance: The integration itself.
- Receive the issued credential: Get results pushed to your application.
- Revocation: Invalidate a credential you have issued.
Unfamiliar terms — credential configuration, session, pre-authorized code — are defined in Terminology.