Verification Overview
This is the reference account of the verification flow: who is involved, and what happens in what order. The pages that follow cover each part of it in detail, and every one of them refers back to the step numbers here.
Who is involved
- Your application — usually a website or mobile app. It is the holder's first point of contact. It asks the verification service to start a session, gets the holder's wallet to open the resulting request, and receives the verified claims.
- The credential verification service — the Partisia backend you run. It generates the signed authorization request, handles the OID4VP exchange with the wallet, and validates the signatures on the credential and the presentation.
- The wallet — the holder's own app. It holds the credentials, shows the holder what is being asked for, and submits a presentation containing only the claims they approve.
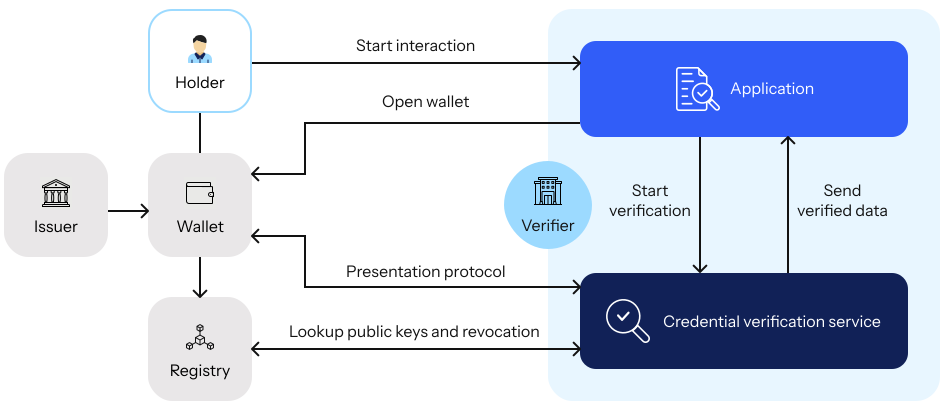
Verification flow
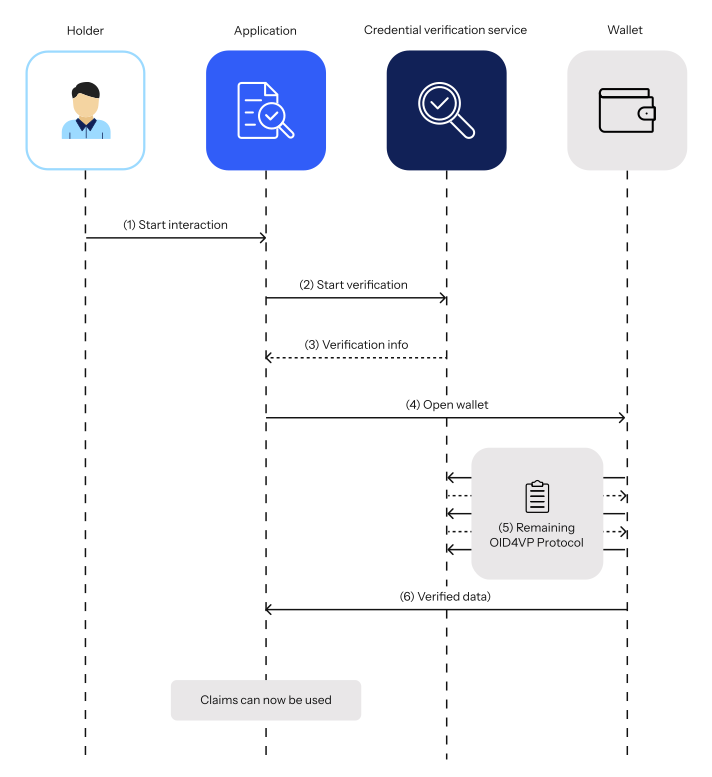
- The holder starts an interaction with your application.
- Your application asks the verification service to start a session, naming a verification query that states which credentials and claims you want.
- The service returns a
session_idand arequest_uri. - Your application gets the
request_uriin front of the holder's wallet — typically as a QR code to scan, or a link to tap. - The wallet and the verification service carry out the OID4VP exchange. The wallet may first check that the request comes from a verifier it is willing to deal with. It shows the holder which claims are being requested, and on approval submits a verifiable presentation containing only those claims. The service then validates it: the wallet's signature, the issuer's signature on the credential inside, and — depending on the credential format — the issuer's certificate chain. This is several round trips and the service handles all of them. See OID4VP presentation protocol for the wire-level detail, and Trust model for how a wallet can establish who you are.
- The verification service pushes the result, including the verified claims, to your application as a POST request. See Receive verified data.
What is yours to build
Step 5 is handled entirely for you, and the part of it the holder sees happens in an app you do not control.
What you implement is step 2 — the call that starts a session — step 4, getting the request in front of the wallet, and step 6, an endpoint to receive the result. That is the whole integration, and it is covered in Request a presentation.
Step 5 needs trust anchors to check the issuer
Which issuers you accept is decided by the trust anchors you configure. See Issuer trust anchors, and Trust model for what is validated with and without them.
What's Next
- Install the verification service: Get it running.
- Verification queries: State what you are asking for. Required before step 2 will work.
- Request a presentation: The integration itself.
- Receive verified data: Get results pushed to your application.
- Issuer trust anchors: Decide which issuers you accept.
Unfamiliar terms — DCQL, holder binding, trust anchor — are defined in Terminology.